Creating a Program
Walk through the 3-step wizard to build a structured program with targets.
Create a Program
A program groups related targets you want to track together - like a communication skills program or an IEP reading goal with multiple objectives. Build one in three steps.
Open your student’s dashboard, tap the + button, and select Create Program.
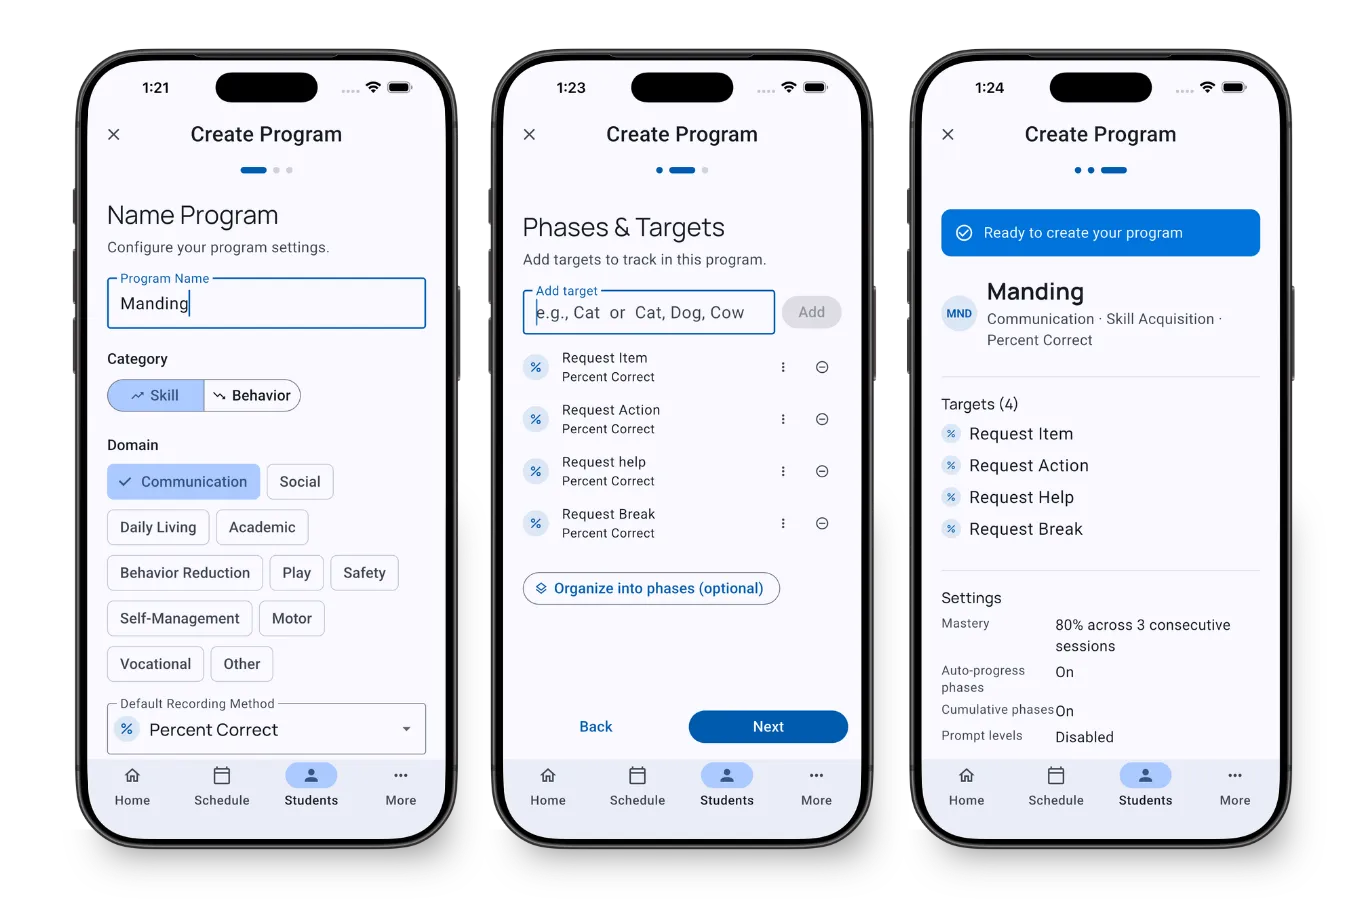
Step 1 - Name Program
- Program Name - A descriptive name (e.g., “Manding” for a clinical program, or “Reading Fluency” for an IEP goal)
- Category - Choose Skill (acquisition) or Behavior (reduction)
- Domain - The skill area: Communication, Social, Daily Living, Academic, Behavior Reduction, Play, Safety, Self-Management, Motor, Vocational, or Other
- Default Recording Method - How you’ll measure new targets (e.g., Percent Correct, Frequency, Duration). You can change individual targets later if needed
You only need a name and category to get started. Everything else has sensible defaults you can adjust later.
More options (tap to expand):
- Abbreviation - Auto-generated from the name (e.g., “MND”). Appears on program cards during sessions
- Description - Optional notes about this program’s purpose
- Default Mastery Criteria - A reference description of when targets are considered mastered (e.g., “80% across 3 consecutive sessions”). This is a clinical reference for your team - automatic mastery tracking is configured separately per target via STOs
- Auto-progress phases - When enabled, mastering one phase automatically activates the next. You can toggle this on or off at any time
- Cumulative phases - When enabled, mastered targets stay visible during sessions as maintenance probes so you can periodically verify retention
Tap Next.
Step 2 - Phases & Targets
Add the specific things you’re tracking:
- Type names in the Add target field - enter multiple separated by commas (e.g., “Request item, Request action, Request help”) and tap Add to create them all at once
- Each target starts with the program’s default recording method
- Tap the ⋮ menu on any target to change its recording method
- Remove targets with the ⊖ button
Organize into phases (optional):
- Tap Organize into phases to group targets into sequential milestones
- Phases are optional - skip this for programs where all targets run at the same time
School example: For a reading IEP goal, your targets might be “Reads aloud, Answers comprehension questions, Summarizes passage.” No phases needed - all three objectives are tracked simultaneously.
Tap Next.
Step 3 - Confirm
Review your program before creating:
- Program name, abbreviation, domain, category, and recording method
- All targets listed
- Settings (mastery criteria, auto-progress, cumulative phases, prompt levels)
Tap Create Program to finish.
After Creation
Your program appears on the student’s dashboard under the Programs tab. Tap it to view targets, progress, and analytics.
If your program uses phases, the first phase starts as In Progress. Programs without phases show all targets as active immediately. You can add or remove targets at any time from the program’s settings.
What’s Next?
- Auto-Progression and Mastery - Configure mastery rules and automatic phase sequencing
- Programs in Sessions - Collect data on your program’s targets
- Program Analytics - Track cumulative progress and identify stalled phases
Need Help?
Questions about creating programs? Email support@tallyflex.com for assistance.